Showing posts with label recipe. Show all posts

Saturday, January 25, 2014

Carb-Free (Better-Than-Regular) Lasagna

Like pretty much every other person in America I'm trying to avoid refined carbs.  That being said, I'm NOT willing to sacrifice good food to make that happen!  Life's too short to eat anything yucky.

My favorite pasta dish by far is lasagna, and the noodles in that are pretty much just for structure.  So a few weeks ago I was wondering... could I replace the noodles with a neutral-tasting veggie like zucchini or eggplant...?  With that thought, I went ahead and made a batch of fake lasagna with eggplant slices.

My expectation was that the eggplant would be firm but pretty flavorless.

As it turns out, I was WRONG - but in the best way possible!  The eggplant was NOT flavorless - it was DELICIOUS!  I was really surprised since I haven't eaten much eggplant before.  Since then I've made the eggplant-lasagna again not because it's carb-free, but because it tastes amazing.  Seriously.

Carb-Free (Better-Than-Regular) Lasagna

1 Eggplant
Cottage cheese or ricotta cheese, whichever you prefer
Pasta sauce
Mozzarella cheese
Garlic


Peel your eggplant!


Slice it thinly, and sprinkle both sides of each slice with a pinch of salt.  Lay the slices of eggplant on towels, with a new towel between each layer.  Then put a towel on top of the last layer, and press it down with something heavy.  (I used quart jars of stock I had nearby.)


Leave the salted eggplant under the weight for about an hour.  The salting and pressing are to get rid of excess water, so that you can brown the eggplant and your lasagna won't be waterlogged.  You can see in the above picture how much water came out of just one eggplant!  

Once an hour has gone by, rinse the salt off the eggplant and pat dry.


Heat some oil in a frying pan on medium-high until it starts to smoke.  Add a few slices of eggplant, and really brown those suckers on both sides!  The browned parts are the tasty parts.  Mm'mm....


Once all your eggplant is browned, just assemble the rest of ingredients like you would for any other lasagna.  Put some sauce in the bottom, add eggplant 'noodles', ricotta, mushrooms, and mozzarella cheese.  Repeat until your lasagna pan is full!  Since Jack is out of town this weekend, I used my loaf pan to make a small lasagna just for myself.  :-)


Bake at 350 for 45 - 60 minutes, until it's bubbling at the edges.

Doesn't that look delicious?  You'll never miss those bland noodles!

Thursday, January 23, 2014

The 2 Secrets To Canning Tomatoes The EASY Way

There are a LOT of awesome tomato products to can - tomato sauce, salsa, pizza sauce, tomato paste, stewed tomatoes, diced tomatoes, whole tomatoes, tomato juice.........  The list goes on and on!

And I've found that there are 2 tips to canning tomatoes that can really make the process a LOT easier.

Secret #1 - Freeze your tomatoes.

I learned this tip from my mother-in-law, and it makes such a HUGE difference!

Ok, why is freezing the tomatoes such a big deal?  For 2 reasons: It makes skinning your tomatoes WAY easier, and it thickens the tomatoes without having to boiling them all day.

Normally with any tomato product you want to can, the instructions start out by telling you to skin your tomatoes by dipping them a few at a time into boiling water and then shocking them in ice water.  This process takes FOREVER, and involves handling incredibly hot tomatoes.

When you freeze your tomatoes you make skinning the tomatoes approximately 1,000,000 times easier, because all you have to do is thaw your tomatoes and pull the skin off.  No boiling, shocking in ice water, or struggling to hold a burning hot tomato!!  It's also way faster.

Another benefit to freezing your tomatoes is that when you thaw them, you'll end up with a freezer bag of tomatoes floating in liquid.  That liquid is excess water you would normally need to boil off to thicken your tomato product.  Pour off the excess liquid (or keep it as a type of weak tomato juice / tomato stock - it's a great base for soups).  Now all you have to do is bring the tomatoes up to a boil and you're ready to go!

Also, if you happen to be growing your own tomatoes freezing them makes it much easier to store a big enough number of tomatoes to can in bigger batches.  You can also wait to can them when it's most convenient for you, instead of rushing to can them before the tomatoes start to go bad.

Secret #2 - Use Your Crockpot To Thicken Tomatoes Like A BOSS

Even when you freeze your tomatoes, some tomato products require extra thickening (tomato paste and pizza sauce leap to mind).

Normally recipe instructions tell you to simmer your tomatoes on the stove for hours, stirring constantly.  Sure, you end up with thicken tomatoes... but also arms that feel like they're about to fall off and a stove top so covered in tomatoes splatters it looks like tomato bomb had gone off in your kitchen.

The easier way is to dump your pureed tomatoes into your crockpot, wedge the lid open a crack with a spoon or chopstick, and walk away.  It doesn't splatter everywhere and you don't have to worry about it scorching on the bottom.  Score!

Easy & Delicious Homemade Pizza Sauce Recipe

Tomatoes
Salt
Brown sugar
Spices of choice (classic options include oregano, basil, garlic, basil, red pepper flakes, parsley, etc)
Bottled lemon juice

Puree the tomatoes until they're smooth.  Dump them into your crockpot, and turn it on 'high'.  Walk away.

Your want the tomatoes to reduce by about 1/2 or even 2/3 (depending on how thick you want your sauce), and how long it will take depends on a lot of factors.  My crockpot was totally full, and it took about 24 hours to cook down 2/3 for a pretty thick consistency.

Once it's as thick as you want it, taste the plain tomatoes.  They probably taste a little flat and tart.  Add a sprinkle of salt and a spoonful of brown sugar at a time, and taste it again.  Keep going until it's where you want it.  Papa John's pizza (which I happen to LOVE) uses a sweeter sauce.  I would be conservative on adding the salt, since a lot of pizza topping can be pretty salty (pepperoni, sausage, olives, feta, anchovies, etc).  For my own batch of pizza sauce I added a few sprinkles of brown sugar, and also a dash of balsamic vinegar.  Yum!

Once the salt and sugar levels are good, add your spices of choice.  I added 1 small diced onion, 5 cloves of garlic, parsley, and basil.  Our family has people who are pretty sensitive to spicy food or I would have added a good dash of red pepper flakes, too.  I'll just put those on my individual slices of pizza ;-)

To can, I followed the Ball Blue Book instructions for tomato sauce that had also been cooked down by adding a 1/2 tablespoon of bottled lemon juice to each half pint jar and processing the jars for 35 minutes in a water-bath canner.

Ta-da!  Delicious pizza sauce, just the way you like it!

Tuesday, January 14, 2014

Homemade Soda Flavors

 It's a rainy day here, so I'm knocking around in the kitchen trying my hand at something I've been mulling over for a while, now: homemade soda flavors.

As I've mentioned before, we got a SodaStream back in October for my birthday.  I love plain seltzer water, but Jack really prefers to have some sort of flavoring in his.

The SodaStream brand of soda syrup is pretty pricey, so I got a few bottles of flavored syrup like they use in coffee shops.  With the SodaStream right there, we go through a LOT of homemade seltzer and soda, so we burn through those bottles of flavored syrup.

To get a new C02 cartridge is $30 since we have the large size, and each bottle of flavored syrup costs around $10.  Suddenly homemade soda isn't such a frugal option anymore!  The main problem is spending $10 for the flavored syrup.  Surely it would be cheaper to make our own?  That way we can also control what ingredients get used, too.

I've already toyed around with this a little bit when I made my own 'Orangina' flavor.  So today I made another batch of that, and also tried something new.

Cinnamon Apple Soda Syrup

1 cup sugar
1/2 cup water
1 small apple, cored and sliced
Small dash cinnamon
Vanilla

I added all of the ingredients into my VitaMix and let it run for a few minutes to really break down the apple into apple juice.  It turned into this lovely light brown syrup!

When I added it to a glass of seltzer water, it tasted a lot like sparkling apple cider.  Yum!

I do think it could be improved.  The apple flavor could be deeper - next time I want to try to chop up the apple and lightly sear it in a frying pan with the cinnamon to caramelize some of the natural sugar in the apple.  Mm'mm... maybe it would taste more like a caramel apple?  I can hope!

When summer rolls around I plan on trying other seasons fruits.  Raspberries and honey!  Blackberries and vanilla!  Melon and mint!  Maybe even cucumber and lime?  

Monday, December 30, 2013

VITAMIX (And The Best Strawberry Daiquiris EVER)

My mother-in-law has a Vitamix blender, which I have coveted for many years.  But here's the thing - I am WAY too cheap to EVER shell out that much money on a single kitchen gadget - even the blender of my dreams.

Getting the Vitamix Christmas morning!
Meanwhile the blender I DO have is ancient and literally won't blend up softened carrots and onions.  Never mind blending something as challenging as ice (or anything frozen, for that matter).

Well, for Christmas this year several of my family members got together, pooled their resources, and BOUGHT ME A VITAMIX.

Yup.

I think that needs repeating -

THEY BOUGHT ME A VITAMIX.

My very own Vitamix blender.  SQUEEEEEEEEEEEEE!

What with the holidays and everything, I was only able to make it to the grocery store today.  And I basically bought EVERYTHING THAT COULD BE BLENDED.

Yes.

Everything.

I got stuff to make smoothies!
I got cauliflower to turn into cauliflower soup and cauliflower puree!
I got the stuff to make the best spread / dip ever!

Best Spread Ever (AKA Cilantro Spread)
2 cups lightly packed cilantro
1 small onion
1" fresh ginger
1 cup toasted cashews
2 teaspoons cumin
1 teaspoon sugar
3/4 teaspoon salt
Juice of one lime

Blend everything together.  Serve.  Watch it disappear before your very eyes!

The cashews make this really creamy (kind of like adding peanut butter to something).  It's so good!  We've all started bringing this to neighborhood functions.  Try it - you won't be sorry!

So after my grocery store trip today I pulled out the recipe booklet that comes with the vitamix, and like the fourth recipe was for strawberry daiquiris, and I magically had ALL THE INGREDIENTS (because I had bought frozen strawberries for *cough, cough* smoothies).

I immediately made strawberry daiquiris.

Jack and I immediately drank the strawberry daiquiris, which turned out to be the best strawberry daiquiris I had ever had!

Strawberry Daiquiri Recipe From Vitamix Booklet
Strawberry Daiquiris FROM HEAVEN
2 oz Rum
1 oz Triple Sec
2 tablespoons lime juice (I just used a whole lime's worth)
2 tablespoons sugar
1 generous cup of frozen strawberries
(the recipe also called for 1 1/2 cups of ice, but I didn't have any and didn't miss it)

PRO TIP: After making these daiquiris a few times (cough, cough), I've noticed that if you dump all the ingredients in the blender at once, the liquor tends to lower the freezing point of the strawberries so that if you blend long enough to truly break down the frozen strawberries your daiquiri is now a liquid instead of having a slushie consistency.  I would recommend blending everything EXCEPT the liquor until you basically have a strawberry smoothie, and then quickly pulsing in the liquor at the end right before serving.

 Ever meal for the next few months will probably have at least one blended / pureed component.  I can't wait!

Other Vitamix Recipes:
Vitamix Mai Tai
Easy Homemade Chicken Gravy
Homemade Soda Flavors


Monday, November 18, 2013

Venison Jerky & Canned Stew Meat

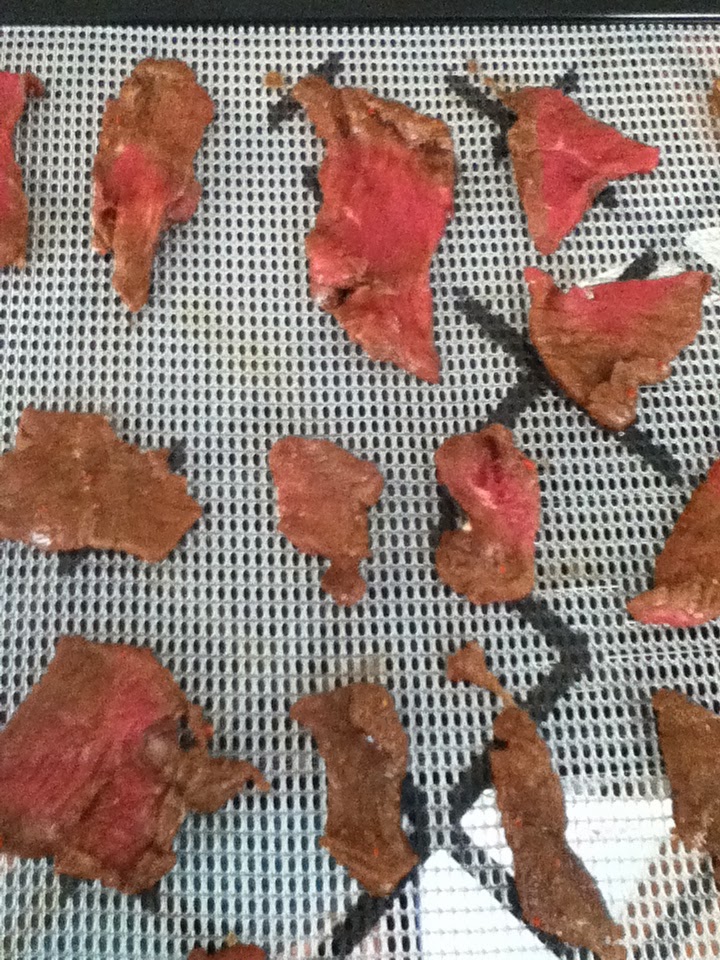
Venison going into the dehydrator...
 As I mentioned previously, to my extreme excitement a neighbor recently gave us a whole deer.

I spent all day Sunday butchering the deer into either roasts, steaks, stew meat chunks, or ground venison.  I ended up with just 3 pounds of ground venison because I only ground the meat that for one reason or another I couldn't leave as another cut.  I kinda figured that I can always turn stew meat chucks INTO ground meat if I need to, but the reverse won't work.

Now that the venison has been broken down, I spent today on various venison-projects.  I made venison jerky, and also pressure canned 8 pints of venison stew meat.

Venison jerky coming out of the dehydrator!
We have a standard fridge-with-tiny-freezer-on-top, so I knew there was no way I was going to be able to fit all the deer into our freezer.  So canning some of the stew meat meant I didn't have to cram it ALL into our tiny freezer, which certainly helped!

The other reason I wanted to can some venison is to see what difference it makes to the texture of the meat.  I haven't cooked a whole lot with venison thus far, and we're more used to eating beef so venison often seems to have a 'chewy' texture to us.

Since pressure canning really tenderizes meat, my theory is that pressure canning will make it's texture more like beef.  If so, we'll have a winter of tasty venison stews and stroganoff ahead of us!

For the venison jerky, I cut one of the roasts into thin slices and then marinaded it overnight in Alton Brown's jerky recipe:

2/3 cup Worcestershire sauce
2/3 cup soy sauce
2 teaspoons ground black pepper
2 teaspoons onion powder
1 teaspoon liquid smoke
1 teaspoon red pepper flakes
1 tablespoon honey

I made jerky last year and let it run overnight, which dried out the jerky TOO much - it was like leather!  So this year I cut it a little thicker and am checking it regularly.  It smells SO good while it's in the dehydrator!  Mm'mm.....

Thursday, September 19, 2013

Canning Winter Squash

I saw that last week that my local Kroger had winter squash on sale, so I got 2 HUGE butternut squash.  I've really been wanting to try canning my own pumpkin and winter squash!

Some people might wonder why go through the work to can squash / pumpkin when it's already so shelf stable?  Well, the idea appeals to me for several reasons.

1.) Laziness!  It's a lot of work to somehow chop through these monsters and carve them up.  It definitely does not qualify as a quick-and-easy weeknight dinner by any stretch of the imagination.

2.) They're huge!  One butternut squash or pumpkin is usually waaaaay more than just 2 people can eat in one meal, and Jack's not a huge fan of leftovers.

3.) We might not like it!  I don't have a huge repertoire of tried-and-true squash recipes (see reasons #1 and #2), but I'd like to.  So that means I'll be trying new recipes that we might or might not like.  I don't want to end up with a refrigerator FULL of leftovers from a meal we weren't wild about but now feel guilt-induced to eat anyways.

So I peeled and chopped the butternut squash into 1-inch cubes, boiled them for 2 minutes, and pressure canned them for 90 minutes per the instructions found here.  The 2 butternut squash turned into 7 quart jars, which is exactly how much will fit into the pressure canner in 1 load so I was pretty happy about that.

Here is one of the recipes I can't wait to try with the canned squash, from the book "The Feast Nearby" by Robin Mather.

Thai-Style Squash Soup

4 c. chicken broth
1 quart squash / pumpkin chunks, drained
2 tsp fresh ginger
3 cloves garlic
1/2 tsp red pepper flakes
1/4 c. peanut butter
2 TBS rice vinegar
2 TBS chopped scallions
1/4 c. chopped cilantro
1/3 c. milk

Combine the broth, squash, ginger, garlic, and pepper flakes in your soup pot and bring to a boil.  Turn down to low, cover and simmer for around 20 minutes.  Puree the soup until smooth, and whisk in the peanut butter, vinegar, scallions, milk, and a pinch of the cilantro.  Serve, sprinkling more cilantro in each bowl.

Friday, August 16, 2013

Pesto Soup

The first thing I've made with the recent batch of pesto was pesto soup.  I actually found a lot of recipes online for pesto soup in a wide range of styles, and found out that apparently it's traditional to finish some french soups with a garnish of pesto.  Huh!

This particular pesto soup recipe was one I already had all the ingredients for, so I decided to give it a try.  I did change a few things from the recipe - I added a garnish of chopped bacon to convince Jack to give it a try, and a dash of freshly cracked pepper and sprinkle of Parmesan cheese.

I thought it was really good, but would strain a little more of the water out before blending next time since I like a thicker texture to my soups.

This seems to be a good candidate for those times when you need a quick and easy dinner - the peas and pesto were both frozen and the rest of the ingredients are pantry staples.

On those nights when I'm tired and don't know what to cook (or even just don't feel like messing with it) it's so easy to turn to convenience foods like frozen pizza or boxes of macaroni with the neon orange powder that's supposed to be cheese.  I love finding recipes for HEALTHY food that would be just as easy to always have on hand for those times.

Pesto Soup Recipe 
(based on this recipe)

2 cups water
3 cups frozen peas
3 cloves garlic
splash of cream
1 teaspoon salt
juice from 1 lime
1/4 cup fresh pesto

Directions
Combine peas and water on stove, bring to a boil.  Blend peas and rest of ingredients together, adding just enough of the warm cooking water to get the consistency you like.  Once it's blended, pour back into the pot and simmer for a few minutes to meld the flavors.  If you like, garnish with Parmesan cheese and bacon.

Monday, July 15, 2013

AUGH! Pickle Mishap

So far every jar I've canned this year has been either a pint or a half-pint size.  It's just Jack and I, and when you're feeding just 2 people you don't need too much for any one serving.  Also we've been trying out recipes to see which we like, and I don't want to make too much of something just to find out we don't like it.

However, that all changed today!  I used quart jars to make a bigger batch of garlic dill pickles since they are quickly becoming one of our favorite snacks to have on hand.  

I made 6 quarts of the pickles and popped them into the water bath to can for 10 minutes, and when the 10 minutes were up I pulled away the cover on my large pot to find.... cucumbers floating in the boiling water!?  

As it turns out on of the Mason jars broke during the water bath process.  Awwwww...  All those potential cucumbers, wasted!

I've been getting my jars from friends, neighbors, and family members in order to lower the cost of getting into heavy canning production.  New jars are the largest start-up cost and I've managed to get all mine for free, but this may be a consequence of that.  Who knows what these jars have been put through in their past.  
Sigh...  At least I still have 5 lovely quart jars of pickles to add to our pickle stash.  Below I've included the recipe I've been using from Serious Eats.

YIELD: 4 pint jars or 2 quart jars 

2 quart kirby cucumbers (approximately 3 pounds) 
1 1/2 cups apple cider vinegar 
1 1/2 cups filtered water 
2 tablespoons pickling salt  
8 garlic cloves, peeled (I always use extra)
4 teaspoons dill seed (I've been using fresh dill flower heads since I'm growing my own)
2 teaspoons black peppercorns 

Prepare your jars.  Wash and dry the cucumbers, and remove blossom end. Combine vinegar, water and salt in sauce pan and bring to a boil.  Equally divide garlic cloves, dill, and black peppercorns between jars. Pack prepared cucumbers into jars as tightly as you can without crushing them.  Pour the brine into the jars, leaving 1/4 inch headspace.  Wipe rims and apply lids and bands (don't screw them on too tightly).  Process in a water bath for 10 minutes.  Let pickles rest for at least one week before eating. [See full recipe for more in-depth instructions]

Monday, July 8, 2013

Make Your Own Lip Balm

Making your own lip balm is super easy, and very rewarding!

Not only is it cheaper to make your own, but you can put exactly what you want in it and avoid weird chemicals with names nobody can pronounce.  Plus you can get pretty much every thing you need to make it at your local grocery store.  It's a win-win!

I use the customizable recipe from Majestic Mountain Sage:

Make Your Own Lip Balm Recipe
20% Beeswax
25% solid at room temperature oil (Coconut Oil, Palm Oil, Shea Butter, etc.)
15% brittle at room temperature oil (Cocoa Butter, Palm Kernel Oil, etc.)
40% liquid oil at room temperature (Sweet Almond Oil, Olive Oil, Avocado Oil, etc.)

You just weigh out your ingredients, gently warm them over the stove or in the microwave to melt them, then pour into your lip balm containers.  You can reuse old washed lip balm containers or any tin or tube that works for you.

Because the warm, liquid lip balm mixture will contract once it cools and solidifies, don't fill your lip balm container to the very top at first.  Pour in enough to fill 90% of the container and then let the lip balm solution cool and harden.  THEN pour the last 10% into the container.

You can also add a flavor if you want.  It could be a drizzle of honey for some sweetness, mint extract, vanilla extract... whatever tickles your fancy.

VoilĂ !  You're all set to enjoy your lip balm!

Berry flavored lip balm


Friday, July 5, 2013

Fishing!

One of my sister-in-laws is in town this weekend with her boyfriend, and we all decided to go fishing in the neighborhood pond this morning.  The pond has small freshwater fish in it like brim and bass.  

We had a blast!  Pretty much everybody caught at least one fish, and my mother-in-law fried the fillets using her special ultra-delicious technique.  

What's that?  You want to know what her special ultra-delicious technique is for frying up fish?  Well, ok then.

Super Special Ultra Delicious Fried Fish

1 egg, beaten
Buttery crackers, crushed fine (Ritz crackers work well)
Freshly caught fish fillets

Dredge the fish in the egg, then in the crackers crumbs.  Fry in oil brought to 350 degrees until done.  Serve with lemon wedges.

Seriously, it sounds super simple (and it is) but you will not believe how deliciously scrumptious this is.  


Monday, June 24, 2013

Canned Corn Review Is In!

I don't know about you but when I think of canned corn it doesn't exactly inspire excitement.  However, I went ahead and used my new pressure canner to process a few cans of fresh corn from the farmer's market since I just don't have the freezer space to save up a bunch of this primary vegetable.

Since this is all an experiment and I wanted to see how the homemade canned corn worked, I went ahead and made our favorite wintertime soup (where most of the canned corn will surely end up) this weekend to see how we felt about it.

This soup is a corn chowder, so corn plays the main role.  It also involves hearty potatoes, cream, chives, and bacon... yum!

We found out that the canned corn actually worked amazingly well in the soup!  I don't know if it was the fact that I so recently canned it, but the corn was firm and sweet and held up perfectly in the soup.  Also, the pint quantity was just the right amount.  Yay!

Now, let's see how well it does this winter.

This is a soup recipe my parents made while I was growing up, and I still make it regularly during cold weather.

Corn Chowder

3 or 4 red potatoes per person
Chicken broth to cover potatoes
2 - 3 garlic cloves
1 cup heavy cream, or about 2 cups 1/2 & 1/2
1 pint homemade canned corn (or a bag of frozen corn)
1 lb bacon
Chives, for garnish

Cut up your potatoes into bite-sized pieces.  Toss into your soup pot, and cover with chicken broth.  Add minced garlic.  Simmer potatoes until tender.  Cook bacon, drain off bacon grease.  Add cream, bacon, corn, and chives to the soup.  Add salt & pepper to taste.  Gently simmer for at least 15 minutes to let flavor meld.  Serve!