Showing posts with label canning. Show all posts

Thursday, January 23, 2014

The 2 Secrets To Canning Tomatoes The EASY Way

There are a LOT of awesome tomato products to can - tomato sauce, salsa, pizza sauce, tomato paste, stewed tomatoes, diced tomatoes, whole tomatoes, tomato juice.........  The list goes on and on!

And I've found that there are 2 tips to canning tomatoes that can really make the process a LOT easier.

Secret #1 - Freeze your tomatoes.

I learned this tip from my mother-in-law, and it makes such a HUGE difference!

Ok, why is freezing the tomatoes such a big deal?  For 2 reasons: It makes skinning your tomatoes WAY easier, and it thickens the tomatoes without having to boiling them all day.

Normally with any tomato product you want to can, the instructions start out by telling you to skin your tomatoes by dipping them a few at a time into boiling water and then shocking them in ice water.  This process takes FOREVER, and involves handling incredibly hot tomatoes.

When you freeze your tomatoes you make skinning the tomatoes approximately 1,000,000 times easier, because all you have to do is thaw your tomatoes and pull the skin off.  No boiling, shocking in ice water, or struggling to hold a burning hot tomato!!  It's also way faster.

Another benefit to freezing your tomatoes is that when you thaw them, you'll end up with a freezer bag of tomatoes floating in liquid.  That liquid is excess water you would normally need to boil off to thicken your tomato product.  Pour off the excess liquid (or keep it as a type of weak tomato juice / tomato stock - it's a great base for soups).  Now all you have to do is bring the tomatoes up to a boil and you're ready to go!

Also, if you happen to be growing your own tomatoes freezing them makes it much easier to store a big enough number of tomatoes to can in bigger batches.  You can also wait to can them when it's most convenient for you, instead of rushing to can them before the tomatoes start to go bad.

Secret #2 - Use Your Crockpot To Thicken Tomatoes Like A BOSS

Even when you freeze your tomatoes, some tomato products require extra thickening (tomato paste and pizza sauce leap to mind).

Normally recipe instructions tell you to simmer your tomatoes on the stove for hours, stirring constantly.  Sure, you end up with thicken tomatoes... but also arms that feel like they're about to fall off and a stove top so covered in tomatoes splatters it looks like tomato bomb had gone off in your kitchen.

The easier way is to dump your pureed tomatoes into your crockpot, wedge the lid open a crack with a spoon or chopstick, and walk away.  It doesn't splatter everywhere and you don't have to worry about it scorching on the bottom.  Score!

Easy & Delicious Homemade Pizza Sauce Recipe

Tomatoes
Salt
Brown sugar
Spices of choice (classic options include oregano, basil, garlic, basil, red pepper flakes, parsley, etc)
Bottled lemon juice

Puree the tomatoes until they're smooth.  Dump them into your crockpot, and turn it on 'high'.  Walk away.

Your want the tomatoes to reduce by about 1/2 or even 2/3 (depending on how thick you want your sauce), and how long it will take depends on a lot of factors.  My crockpot was totally full, and it took about 24 hours to cook down 2/3 for a pretty thick consistency.

Once it's as thick as you want it, taste the plain tomatoes.  They probably taste a little flat and tart.  Add a sprinkle of salt and a spoonful of brown sugar at a time, and taste it again.  Keep going until it's where you want it.  Papa John's pizza (which I happen to LOVE) uses a sweeter sauce.  I would be conservative on adding the salt, since a lot of pizza topping can be pretty salty (pepperoni, sausage, olives, feta, anchovies, etc).  For my own batch of pizza sauce I added a few sprinkles of brown sugar, and also a dash of balsamic vinegar.  Yum!

Once the salt and sugar levels are good, add your spices of choice.  I added 1 small diced onion, 5 cloves of garlic, parsley, and basil.  Our family has people who are pretty sensitive to spicy food or I would have added a good dash of red pepper flakes, too.  I'll just put those on my individual slices of pizza ;-)

To can, I followed the Ball Blue Book instructions for tomato sauce that had also been cooked down by adding a 1/2 tablespoon of bottled lemon juice to each half pint jar and processing the jars for 35 minutes in a water-bath canner.

Ta-da!  Delicious pizza sauce, just the way you like it!

Monday, November 18, 2013

Venison Jerky & Canned Stew Meat

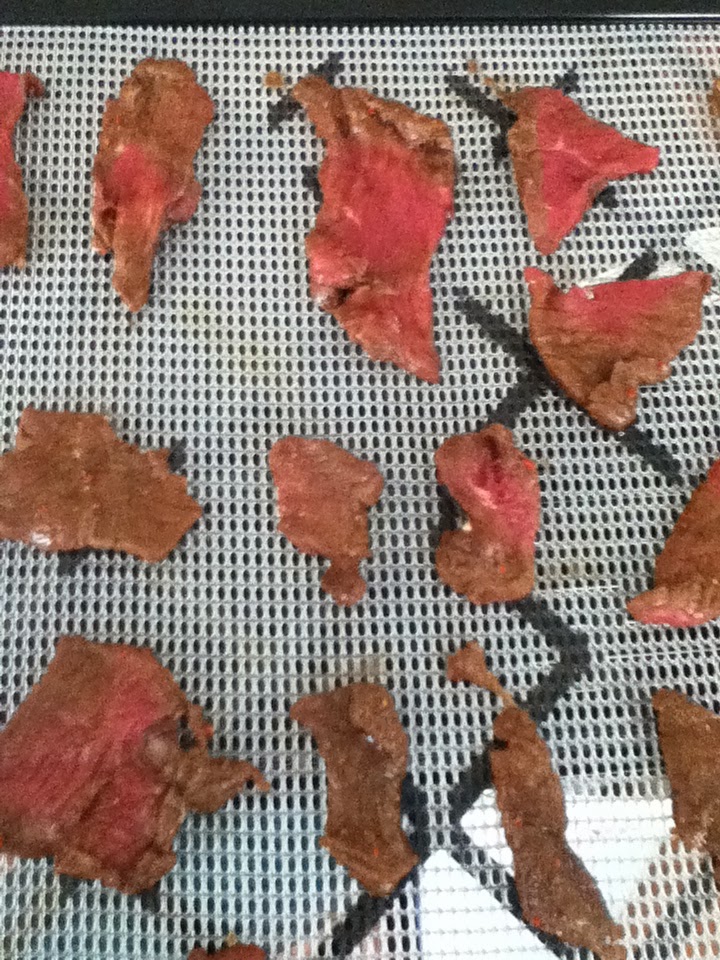
Venison going into the dehydrator...
 As I mentioned previously, to my extreme excitement a neighbor recently gave us a whole deer.

I spent all day Sunday butchering the deer into either roasts, steaks, stew meat chunks, or ground venison.  I ended up with just 3 pounds of ground venison because I only ground the meat that for one reason or another I couldn't leave as another cut.  I kinda figured that I can always turn stew meat chucks INTO ground meat if I need to, but the reverse won't work.

Now that the venison has been broken down, I spent today on various venison-projects.  I made venison jerky, and also pressure canned 8 pints of venison stew meat.

Venison jerky coming out of the dehydrator!
We have a standard fridge-with-tiny-freezer-on-top, so I knew there was no way I was going to be able to fit all the deer into our freezer.  So canning some of the stew meat meant I didn't have to cram it ALL into our tiny freezer, which certainly helped!

The other reason I wanted to can some venison is to see what difference it makes to the texture of the meat.  I haven't cooked a whole lot with venison thus far, and we're more used to eating beef so venison often seems to have a 'chewy' texture to us.

Since pressure canning really tenderizes meat, my theory is that pressure canning will make it's texture more like beef.  If so, we'll have a winter of tasty venison stews and stroganoff ahead of us!

For the venison jerky, I cut one of the roasts into thin slices and then marinaded it overnight in Alton Brown's jerky recipe:

2/3 cup Worcestershire sauce
2/3 cup soy sauce
2 teaspoons ground black pepper
2 teaspoons onion powder
1 teaspoon liquid smoke
1 teaspoon red pepper flakes
1 tablespoon honey

I made jerky last year and let it run overnight, which dried out the jerky TOO much - it was like leather!  So this year I cut it a little thicker and am checking it regularly.  It smells SO good while it's in the dehydrator!  Mm'mm.....

Thursday, September 19, 2013

Canning Winter Squash

I saw that last week that my local Kroger had winter squash on sale, so I got 2 HUGE butternut squash.  I've really been wanting to try canning my own pumpkin and winter squash!

Some people might wonder why go through the work to can squash / pumpkin when it's already so shelf stable?  Well, the idea appeals to me for several reasons.

1.) Laziness!  It's a lot of work to somehow chop through these monsters and carve them up.  It definitely does not qualify as a quick-and-easy weeknight dinner by any stretch of the imagination.

2.) They're huge!  One butternut squash or pumpkin is usually waaaaay more than just 2 people can eat in one meal, and Jack's not a huge fan of leftovers.

3.) We might not like it!  I don't have a huge repertoire of tried-and-true squash recipes (see reasons #1 and #2), but I'd like to.  So that means I'll be trying new recipes that we might or might not like.  I don't want to end up with a refrigerator FULL of leftovers from a meal we weren't wild about but now feel guilt-induced to eat anyways.

So I peeled and chopped the butternut squash into 1-inch cubes, boiled them for 2 minutes, and pressure canned them for 90 minutes per the instructions found here.  The 2 butternut squash turned into 7 quart jars, which is exactly how much will fit into the pressure canner in 1 load so I was pretty happy about that.

Here is one of the recipes I can't wait to try with the canned squash, from the book "The Feast Nearby" by Robin Mather.

Thai-Style Squash Soup

4 c. chicken broth
1 quart squash / pumpkin chunks, drained
2 tsp fresh ginger
3 cloves garlic
1/2 tsp red pepper flakes
1/4 c. peanut butter
2 TBS rice vinegar
2 TBS chopped scallions
1/4 c. chopped cilantro
1/3 c. milk

Combine the broth, squash, ginger, garlic, and pepper flakes in your soup pot and bring to a boil.  Turn down to low, cover and simmer for around 20 minutes.  Puree the soup until smooth, and whisk in the peanut butter, vinegar, scallions, milk, and a pinch of the cilantro.  Serve, sprinkling more cilantro in each bowl.

Canning Sauerkraut

 I am helping my mother-in-law with her garden this year, and she planted an entire raised bed of cabbages.  We turned 40 pounds of cabbage into sauerkraut... yum!  It took 2 sauerkraut crocks to hold it all.

On Tuesday we pulled the sauerkraut out of the crocks and divided it up.  In the past, I've frozen my sauerkraut in quart-size freezer bags, but it's often awkward trying to thaw a baseball-sized brick of sauerkraut.

So THIS year I decided (surprise, surprise) to CAN the sauerkraut!  We've really been enjoying the convenience of our other canned foods so this definitely seemed worth a try.  Also, there is no way I could fit this much sauerkraut in my tiny freezer.
Did I mention the part about
having TWENTY PINTS?!

I was quit surprised to find out sauerkraut can be water-bath canned... I guess because it's basically brined?  I was ALSO surprised to find out that my share of the sauerkraut turned into TWENTY PINTS.

Yes.

I now have TWENTY PINTS of sauerkraut.

So, umm.... if anybody has some good recipes for using sauerkraut, let me know.

Wednesday, July 24, 2013

Is Canning Your Own Beans Cheaper? HECK YES

Today I mowed the entire lawn bright & early before it got too hot.  The 'entire' lawn includes both sides of our long gravel driveway, around the apple trees, the small front yard, and the large back yard.  It takes about 2 hours to do it all (not counting the time it takes to stagger back into the house, flop on the couch with a glass of water and recover enough to do anything else).

Then my mother-in-law brought over a squirrel for me to process.  Meanwhile I went through the lengthy process it takes to can dried black beans.  Bring huge pot of beans to a boil, let soak for an hour.  Bring back up to a simmer and cook for 30 minutes.  Prepare jars, boil water to cover the beans, etc.  

I ended up canning 17 pints of black beans.  Amazingly we burn through them pretty quickly since we put them on nachos, in soups, in cold bean salads, etc.  Whew!

So now I'm ready to kick back on the couch with a cold glass of whiskey and relax.  Ahhh...

But FIRST!  Let's figure out if canning your own black beans is cheaper then buying them in the store.

Store Bought Black Beans:
Can of black beans = approximately 99¢
Organic black beans = approximately $1.99

Homemade Organic Black Beans:
Jars = free from family / neighbors
Lids = $1.69 per pack of 12 (14¢ per lid)
4.41 lbs of organic black beans = $7.89
TOTAL = $10.27 / 17 cans, or 60¢ per can

So I now have organic black beans at a FRACTION of the cost they would be from the store.  WHOO HOO!  I don't know about you, but that feels like a total win to me.  :-)

Now for that drink...


Monday, July 22, 2013

Canning Squirrel

Today I canned squirrel meat for the first time.  I didn't realize it, but the path that lead me here was a long and winding one that started last year.

My mother-in-law has 2 apple trees that the squirrels LOVE to raid.  Last year, despite having a bumper crop of green apples, she didn't end up with a single one because the squirrels carried them all off.  Squirrel control was obviously needed.

Killing squirrels led my mind immediately to the question of what to do with them once you'd killed them.  You can't just waste them!  Any other time we've killed an animal, it's for food.

Once the topic of squirrel was raised, I found out talking to friends and family over the winter holidays that - somewhat to my surprise - pretty much everybody I know over the age of 40 has eaten squirrel at some point.

Squirrel?  Eat squirrel??  I'll be honest, my first thought was 'Ewww...'

After talking to a few people who all assured me that squirrel could be pretty delicious I decided to give it a try.  I might like it, I might not, but at least I'd be basing it on how it actually tastes.  A neighbor invited me over for a squirrel lunch one day this spring and I closed my eyes, held my breath, and took a bite.

It tasted like... turkey.  I am not kidding.  It didn't even taste KIND OF LIKE turkey.  If I didn't know that turkey doesn't have such tiny drumsticks I would be convinced I was eating turkey.  I think this might be because turkey is the only dark meat I'm really familiar with, and squirrel is all dark meat.  I know most people have a strong preference in this department, and I happen to like dark meat.... and apparently squirrel.

OK!  Live and learn!

Well... and then I found out that my husband's grandparents really likes canned meat.  What the heck?  I was talking to them about it and they brought up a good point - meat cooked under pressure is super tender, and that's how you can meat - with a pressure canner.  Not only is canned meat tender and delicious, but they then told me how convenient it is for them when they doesn't know what to make for dinner to pull a jar of meat and serve it over mashed potatoes or whatever's handy.

Convenience!  Tasty, tasty convenience.

That is what lead me to save up in the freezer the squirrels my mother-in-law has been trapping so I can try canning squirrel meat.  I pulled them all out this morning and saw I had 9 squirrels.  Surely that's enough to warrant canning them!

Amazingly, the Ball Blue Book has instructions for how to can wild game, including squirrel.  The instructions say for hot pack to cook the squirrels about 2/3 of the way, shredded the meat off the bone, and pressure can.  That sounds pretty easy!

I took the frozen squirrels and brined them for an hour, which also thawed them.  Next I rinsed them off and popped them in my crock pot to cook 2/3 of the way.  Then I took the first one out of the crock pot and let it cool, and then shredded the meat off the bones.

Or at least.... I TRIED to take the meat off the bones.  Nope.  Not coming off at all.  Not even a little bit.

Ok.  Maybe they aren't cooked 2/3 of the way yet?  I put them back in the crock pot for another 30 minutes.

This time with considerable effort I could pull the meat off the bones.  Since the meat hasn't cooked all the way yet, the attachments at the joints haven't really weakened at all.  That means it is SO, SO hard to pull this meat off.

So I stand there at my kitchen counter and s-l-o-w-l-y debone these 9 squirrels.  It takes forever.  The whole time my dogs are sitting at my feet staring up at me, clearly thinking 'Hey, there's a lot of meat up there!  Surely some of that is for us!  We would definitely like some of that meat!  Meat!  Yes, that meat!  GIVE IT TO US!'

The nice thing is that once I had boned the meat the rest was super easy.  I popped the shredded meat into pint jars and poured hot water over the meat.  Then I just pressure canned the meat for an hour and 15 minutes.  I got 3 pints of meat from these 9 squirrels.

Once we try the first jar of squirrel meat, I'll let you know what we think!

UPDATE [11.14.13] I used a can of the squirrel to make Jack some fried rice one night when all other meat options would have required lengthy defrosting.  I tasted some out of the jar, and it just tasted like meat.  I made the fried rice and handed it to him without saying anything to see if he's notice anything was different - nope!  I think if I had told him it was chicken he would have believed me.  So in other words - the canned squirrel turned out pretty darn well!


Monday, July 15, 2013

AUGH! Pickle Mishap

So far every jar I've canned this year has been either a pint or a half-pint size.  It's just Jack and I, and when you're feeding just 2 people you don't need too much for any one serving.  Also we've been trying out recipes to see which we like, and I don't want to make too much of something just to find out we don't like it.

However, that all changed today!  I used quart jars to make a bigger batch of garlic dill pickles since they are quickly becoming one of our favorite snacks to have on hand.  

I made 6 quarts of the pickles and popped them into the water bath to can for 10 minutes, and when the 10 minutes were up I pulled away the cover on my large pot to find.... cucumbers floating in the boiling water!?  

As it turns out on of the Mason jars broke during the water bath process.  Awwwww...  All those potential cucumbers, wasted!

I've been getting my jars from friends, neighbors, and family members in order to lower the cost of getting into heavy canning production.  New jars are the largest start-up cost and I've managed to get all mine for free, but this may be a consequence of that.  Who knows what these jars have been put through in their past.  
Sigh...  At least I still have 5 lovely quart jars of pickles to add to our pickle stash.  Below I've included the recipe I've been using from Serious Eats.

YIELD: 4 pint jars or 2 quart jars 

2 quart kirby cucumbers (approximately 3 pounds) 
1 1/2 cups apple cider vinegar 
1 1/2 cups filtered water 
2 tablespoons pickling salt  
8 garlic cloves, peeled (I always use extra)
4 teaspoons dill seed (I've been using fresh dill flower heads since I'm growing my own)
2 teaspoons black peppercorns 

Prepare your jars.  Wash and dry the cucumbers, and remove blossom end. Combine vinegar, water and salt in sauce pan and bring to a boil.  Equally divide garlic cloves, dill, and black peppercorns between jars. Pack prepared cucumbers into jars as tightly as you can without crushing them.  Pour the brine into the jars, leaving 1/4 inch headspace.  Wipe rims and apply lids and bands (don't screw them on too tightly).  Process in a water bath for 10 minutes.  Let pickles rest for at least one week before eating. [See full recipe for more in-depth instructions]

Monday, July 8, 2013

The Increasing Pantry

Later this year we'll clear about 4 out of our 10 acres, and (hopefully) next spring I'll be all ready to start farming the newly cleared land.  Once that happens, though, I'll need to know how to preserve the harvest as it came in.

So THIS year I've been learning how to can and preserve food.  I've also started a notebook where I save the recipes I've found that we like.

As you can see here, the supply of canned food is slowly adding up!

Even more surprising is how often we've already been using what we've put up.

The first thing I pressure canned was black beans.  I'll be honest - I'm a little scared of pressure canning and turning dried beans into a ready-to-eat state seemed like a pretty easy way to ease into learning this process.  We actually eat a LOT of black beans - soups, nachos, etc.  Just today I realized that we're down to the last 2 jars of black beans!

I am totally hooked on canning my own black beans.  First of all, the dried beans are so much cheaper I can afford to buy organic dried beans and can those.  If you bought canned organic beans in the store, it would run about $2 per can.  Each jar that I canned myself cost less than a dollar.  When I can the next batch I'll post the per-jar cost.

Secondly, canned beans are super convenient.  I NEVER remember to soak dried beans and usually decide it's just too much hassle to bother with them.  These canned beans are ready to go at a moment's notice, however.

It's such a great feeling to see all these jars full of good food just waiting.  I love this version of 'convenience' food.  Just open a jar, and you pretty much have dinner!


Sunday, July 7, 2013

Epic Salsa Adventure

I had what can only be described as an epic salsa-making episode on Saturday.  

I was using the "Zesty Salsa" Ball Blue Book recipe since it called for a whole pound of jalapeños, and my husband's favorite brand of salsa is Mrs. Renfro's Hot Salsa.  Jack is a major consumer of salsa, and salsa-and-chips is one of his go-to snacks, so I REALLY wanted to find a good salsa recipe.  Store-bought salsa isn't cheap!

So Saturday morning I woke up bright and early so I could avoid the crowds and the heat at the farmer's market.  I bought the 11 POUNDS of produce the recipe called for (6 pounds of which were tomatoes) and lugged it back to my car.   Whew!

Next I proceeded to stand in a cloud of hot steam on a scorchingly hot day while I dipped the 6 POUNDS of tomatoes into boiling water so I could skin them.  Then I chopped the mountain of produce the recipe called for and dumped it all in my largest soup pot.  Halfway through the process I realized there was no way this pot was going to be big enough to contain all this produce and had to switch out to my large stockpot.  Even though I was prepping the produce then putting it in the food processor this...... took...... FOREVER.

I got to the pound of jalapeños last, which the recipe called for seeding.  I was worried that if I didn't seed the POUND of jalapeño peppers the salsa would be stomach-rotting, mouth-blistering hot so I started in on that.  The jalapeños I got from the farmer's market were small and really fucking difficult to seed so I ended up throwing in the towel after seeding half the jalapeños.  I tossed 5 unseeded jalapeños into the mix for some heat and figured that was good enough.

The recipe says it will make 6 pints.  I always prep a few extra jars just in case.  This time, after seeing just how much salsa was in that stockpot I prepped TWICE as many jars and ended up filling every single one of them.  Yup... the recipe made twice as much as it said it would even though I diligently followed the amounts called for in the recipe.

We definitely ordered pizza for dinner after that.

The nice thing about salsa is, unlike pickles, you don't have to wait to try a jar.  We popped a jar in the fridge and tried some later that night.

And the salsa was...... watery.  Watery, and not spicy AT ALL.  Jack bravely said the salsa was fine and that he would still eat it, but he gently suggested we should give a few jars away to friends.  It would be one thing to test a recipe and have 6 jars of it to use up (taco soup, casseroles, etc), but to have TWELVE jars staring you in the face is something totally different.  

The tomatillo salsa (again from the Ball Blue Book) that I made earlier in the summer was way better.  And made a much smaller batch.  

Sigh... I'll have to try making salsa again.......... one day.  Maybe when the memories of yesterday's salsa making episode have faded a bit. 

UPDATE 7/8/2013 - I gave a jar to my mother-in-law when she stopped by to drop off a squirrel she had trapped, and she emailed me later that the salsa "is awesome!!!"  So it may grow on us.  

Saturday, June 29, 2013

Pickled Jalapeños and A Painting

 For the first time this year there were fresh jalapeños at the Durham farmer's market (cue dancing in the streets and tossing of the confetti)!!

My husband and I use a ton of pickled jalapeños and have a tough time making a freshly opened jar last very long, so I snatched up all four containers of the jalapeños.  They ended up making 5 pints of pickled jalapeños.  Not bad!

I found a very basic pickled jalapeño recipe where you just pour a vinegar brine over the sliced jalapeños and then put them in a water bath for 5 minutes.  I'm so excited!!  I didn't seed the jalapeños since the pickled jalapeños we buy at the store clearly have all the seeds.  I wonder how spicy these will end up being?

Also, I always follow the instructions for how much headspace to leave when I fill the jars, and I ALWAYS end up with my produce floating up out of the liquid.  What's up with that?  I'll have to do some research and see if there is a way to prevent that from happening.

In other news, I just finished my first painting in many, many years!  I loved painting when I was in school, and was a very.... shall we say 'enthusiastic' artist.

As it happens this week I was wandering around in a Pier 1 store and there was a painting of a tree where the leaves were splatters of paint.  It looked like it would be SO MUCH FUN to make something like that!  I immediately went a few stores down and bought the basic acrylic paint kit and tried to make my very own 'splatter tree'.

I'm not sure what I think of it yet, but I had a great time with the project.  I got one of those 5-packs of the canvas-board, so I'll have to try my hand at something else.

Tuesday, June 18, 2013

Weekend Canning: Corn & Pickles

My husband and I live on 10 acres of land, but only a very small part of it has been cleared so far.  We're planning on clearing around 3 acres this fall, and then I'll set up the GARDEN OF MY DREAMS and have room to garden my heart out!

In the meantime, I couldn't put in a garden this year because the big equipment that will be used this fall will have to go right through my current tiny garden area over by the side of the house.  So that means this year I've been getting my fresh produce from friends and the local Durham farmer's market.

This weekend they finally had sweet summer corn!  Who doesn't love the first corn of the summer??  I knew I wanted to put up a good number of pints for making soups and stews this winter, so I loaded up 20 ears of corn.  Once it was weighted, it turns out that was 10 pounds worth of corn.  Man!  I was going to can SO MUCH corn!!

Except... once I got it home and managed to finagle the corn off the cob (which was harder to do than I thought it would be and little pieces of corn ended up all over the kitchen floor, sad to say) I only ended up with 4 pints of corn.  Wow.

On the other end of the canning spectrum, I also canned some garlic dill pickles.  I have been looking and looking for the tiny cucumbers my grandmother used to make her pickles, but I guess unless you have your own plants and can pick them right away, that just isn't going to happen.  So I settled for the smallest cucumbers I could find and ended up with a handful of cucumbers.  Surely this won't add up to much!

Surprise again!  I ended up with 3 pints (I know, I know... not a huge amount, but still more than I thought it would be!).  Once I crammed in plenty of garlic cloves and heads of dill, it didn't take too many of the cucumbers to fill up a pint jar.  YAY!

Again, the hardest part of the whole thing is the waiting.  We're supposed to wait a whole week before we crack open the pickles and try them.  We'll see if we last that long...